Painting a Guitar the Right Way. Step by Step
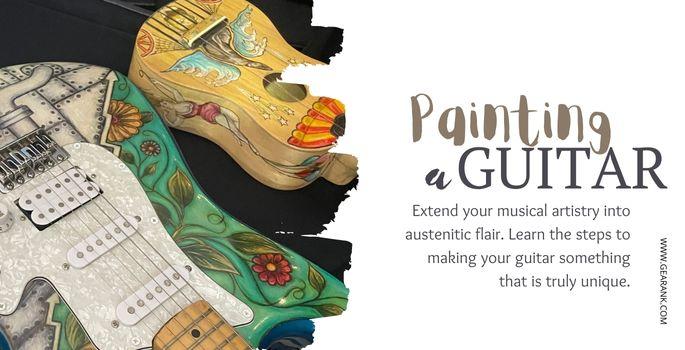
Painting a guitar can take your instrument from boring to inspiring. You'll feel much more excited to play when your guitar looks good.
Whether you're unhappy with the color or the finish is looking past its prime, a re-paint can rejuvenate an old electric guitar.
It's a long process but with patience and know-how, it is doable.
In this guide, I'll walk you through the steps to repainting a guitar. From stripping to polishing, I'll cover everything you need to do for a glossy, professional-quality finish.
Before You Start Painting An Electric Guitar
Painting a guitar can be a fun and rewarding project. But before you get started, it's essential to be aware of the scale of the task.
Painting a guitar isn't just about grabbing a brush and getting started. There's a lot of preparation and tools needed.
And each step requires care and attention. Otherwise, you'll have to start all over again.
That's not to say it's impossible, but it's not a walk in the park either. Wood is a tricky material to work with but a forgiving one.
So if you want to revitalize your guitar with a new paint finish, you'll have to take it seriously.
If you're stripping and refinishing a guitar, prepare for a lengthy task. Bu the result is well worth the effort, a fresh new guitar you can't wait to get your hands on.
Note that this is a time consuming process with all the stages and drying time. So, if you need your guitar in the next few weeks, wait before you start painting. Rushing the finish can ruin the look.
How To Paint A Guitar
I recommend reading through this guide thoroughly before you get started. To achieve the right finish, you need to work in layers. Accidentally skip a step, and your guitar won't have that glossy shine.
Painting a guitar body involves stripping, filling, painting, and finishing. Ready to get started? Let's explore the steps.
Gather Your Tools and Equipment
You don't need much in the way of specialist equipment to paint a guitar. The filler, paint, and finish are the most important things.
Before you get started painting guitars, here are the things you need:
-
Medium Grit Sandpaper
Medium-grit Sandpaper is relatively coarse. This strips away the old paint and sand down the wood. If the surface is particularly thick, you may need coarser sandpaper. 120 grit is commonly used.
-
320 to 1000 Grit Sandpaper
A finer sandpaper, 320 grit sandpaper, is used to smooth the surface of the wood. This prepares it for painting, helping the layers adhere to the surface.
The ultra-fine 1000-grit sandpaper is also used to create the perfect glossy finish.
-
Orbital Sander (Optional)
You may need an orbital sander to strip a guitar's finish quickly. These powered sanders can quickly strip away even thick layers of lacquer paint.
-
Dust Mask And Goggles
Sanding a guitar will release a lot of dust. Use a dust mask and goggles to protect yourself as you work. For the clear coat, you will need a respirator mask.
-
Screwdrivers
You must remove the hardware from your electric guitar for an even finish. Use a set of screwdrivers to safely and efficiently detach the parts.
-
Masking Tape
There might be some areas on the guitar (like fretboards) you want to avoid being painted. Masking tape can protect these parts during the painting process.
-
Tack Cloth
Sticky tack cloth helps remove bits of dust and dirt that cling to the surface. This ensures a smoother, more even finish.
-
Wood Filler
Wood filler does precisely what it says — fills the grain in the wood. Applying a filler plugs the natural gaps for a smooth surface. Wood filler powder is easy to use and gives a fantastic finish.
-
Paint Thinner
Paint thinner can be used to clean the guitar's surface before painting. It can also be used to create your own spray paint mix.
-
Primer
You must start with a primer if you want a bold painted finish.
-
Paint
Spray paint is the best choice for an even surface. Make your own if you can't find a spray in the color you like. Fill a paint spray gun with your chosen color. Use paint thinner for the right consistency.
If you don't want such a strong finish, switch paint for a wood stain.
-
Clearcoat
The final layer after your paint or stain has been applied. This gives the glossy and strong finish you want for a working electric guitar.
-
Polish (And Optional Rotary Buffer)
Once you're happy with the finish, apply a polish using a rotary buffer. It will give your guitar that professional shine.
Safely Disassembling Your Guitar
The first step to painting a guitar is to take the guitar apart. Not every part of the guitar needs to be painted. Painting can damage some areas and affect the overall sound quality.
-
Start With The Strings
The first thing to remove is the guitar strings. Once they've been removed, it's best to restring with fresh strings. So, you can snip away the strings. Pull them free from the bridge and pegs, and discard them.
-
Take Off The Pickguard
You must use a screwdriver to remove the pickguard from your electric guitar. But first, you might need to remove any knobs and the selector cap.
Carefully loosen every screw and gently lift away the pickguard. The electronics underneath might be attached. If they are, unscrew any pickups and pots. Then, carefully lift away the pickguard and its attachments.
-
Detach The Guitar Neck (Optional)
You may need to remove the neck before you start painting. Bolt-on necks are easy to remove. Just unscrew the neck and lift it away.
Now's a good time to consider whether or not you want to refinish the back of the neck.
This does not apply to electric guitars with set neck, including acoustic guitars.
-
Photograph And Remove The Electronics
How easy or difficult you find removing the electronics will depend on the type of electric guitar. If you have a Strat, the electronics probably came away with the pickguard. If not, you'll have to remove everything manually.
Throughout this process, I recommend taking lots of photographs. Photo where things are on the guitar, how they came away, and how they were attached. You'll have an easy visual to refer to when it comes to reassembling.
Acoustic guitars don't have electronics so this is a non-issue for them. But you may have to remove, or at least cover the preamp of some acoustic-electric guitars.
Most of the electronics are inside the hollow body anyway, so there's no need to remove them, unless you plan on painting the inside - which is not recommended.
-
Stop And Inventory
With your guitar parts stripped, it's time to take a quick break. Catalog everything that has been removed from the guitar. Place each item in a labeled container or bag.
Stripping The Old Paint
Now that you have a basic guitar body to work with, you can move on to stripping. This can be a long and awful process, especially if you have a particularly thick lacquer paint to strip.
The most effective way to paint a guitar is to start with a clean surface. You need to strip the electric guitar back to the wood base. This will give you that smooth and clear finish you want.
Start by donning a dust mask and goggles. You'll also want to put some old sheets down. This is going to get messy. Place the unfinished body on a flat surface, and you're almost ready to go.
-
Protect Anything You Don't Want Painted
You've removed as much as you can from the guitar body, but there will be things you can't take off. These areas need to be protected and covered.
Use masking tape to cover any areas you want to be kept dry. Ensure the tape is flat against the surface with no bubbles. Otherwise, the paint might bleed underneath.
-
Start With A Coarse Grit Sanding Sponge
The initial sanding process is about stripping away as much of the surface as possible without damaging the wood underneath.
You can use your hands to strip the surface. This is a low-cost method but a lot of work. It's also more work to achieve a smooth finish using your fingers.
An orbital sander is very helpful in this situation. It can quickly strip away the old paint job, breaking down the old surface.
Alternatively, use a backing block. It's not quite as effective as an orbital sander, but better than your fingers.
Regarding the curves and crannies, a sanding sponge is your best choice. If you don't have one, wrap your coarse grit sandpaper around a sponge.
Because acoustic guitars have hollow bodies with thin pieces of wood, more care should be done in sanding.
-
Sand The Cavities
Depending on the project, you can skip this step. It's important to note that stripping the cavities helps to create a super professional finish. But for day-to-day use, you won't see a difference.
If you plan on stripping the cavities, use small strips and sanding sponges. This step also helps if you want to apply shielding paint in the cavities.
For acoustic guitars, if you plan on re-painting the sound hole rosette, then you'll also want to sand the sound hole area.
-
Finish With A Fine Sandpaper
At this point, the old paint should be removed entirely from the guitar's surface. But the surface will look like a total mess. Now is the time for, yes, more sanding.
Switch your coarse sandpaper for fine or ultra-fine sandpaper. Use a sanding sponge, or wrap the sanding paper around a sponge. We're focusing on the finish here; your fingers can leave marks.
Working with the wood grain, gently sand the surface of the guitar's body. Use a wet sanding technique for a clean finish. Sand with a sweeping technique and dip the paper in water between passes.
-
Clean Any Dust
When you're happy with the surface, it's time to clean. Carefully brush down the guitar with a cloth to remove excess dust.
Clean your workspace as well. Sweep, vacuum, and throw away dust.
Finish with the tack cloth. Dab the sticky surface over the body to pick away small dust particles.
Filling The Grain
Holes and gaps naturally occur in wood grain. They might be natural, but they can affect the finish of your paint job and the guitar's sound. Wood sealer can solve this problem.
An all-purpose wood filler works best. It is compatible with various coatings. Apply the grain filler using a putty knife or a credit card until you have a level surface. Leave it to dry completely.
When the grain filler has dried, go back over the guitar's surface with fine sandpaper. Roughing up the surface provides the right texture for the next steps. It also removes any build-up of filler outside the crevices.
Clean And Dry
You're nearly onto the coating; there's just one more step. Use a mineral oil paint thinner to remove dust and oils from the bare wood. You only need a thin layer, applied with a microfiber cloth.
Apply the oil to one side of the guitar and leave it to dry. Once dry, flip your guitar and apply it to the other side.
Decide On A Finish
The steps I've listed above are the basic prep steps to refinish a guitar. You need to follow these steps whatever finish you plan on using.
But now it's time to decide: how do you want the guitar to look?
1. Natural Stain
The stain is the natural look for an electric guitar. Leaning into the wood grain, it has an acoustic guitar style. This is a slightly easier method, but done right; it looks terrific.
The wood absorbs the stain, showing the natural grain while adding a darker tint. As you add more layers of tint, the color gets darker, and the grain becomes less visible.
If you stain your guitar, you must be thorough with the stripping. There's no place to hide. Begin by applying with a light touch. Slowly build the layers until you're happy with the finish.
When you've finished staining, skip to the clear coat section in this guide.
2. Semi-Transparent Paint
Partway between a stain and a glossy paint finish, semi-transparent paint allows the wood grain to peek through the paint.
To achieve this:
1. Apply a thin layer of paint directly to the guitar's surface.
2. Don't apply a primer if you want the grain to show through.
3. Leave the paint to dry completely before you start the next coat.
At this point, you can either skip straight to the clear coat or apply another layer. It depends on the strength of the finish you want to achieve.
3. Glossy Paint Finish
Glossy paint is the boldest choice for an electric guitar. A solid paint finish completely covers the wood grain. And it can substantially change the appearance of any guitar. When executed well, the results can be both impressive and long-lasting. You'll also have a lot of color choices, including exotic mirror shine and sparkly finish.
If you want a deeper finish, move on to the next section.
For A Deep, Glossy Paint Finish
The first step is to choose your paint type. Colortone makes guitar-specific lacquer paints, but you can also use enamel paints. Acrylic paint will work in a pinch, but we recommend a specialist paint for the best finish.
-
Start With A Primer
The first step is applying primer. The primer prepares the surface for the paint and acts as a wood surface sealer. Spray using a double pass technique to ensure the area is completely coated.
You want to apply two coats of primer. Leave the first coat to dry before lightly scuffing the surface with a fine-grit sandpaper. Apply a second coat using the same method as the first.
When the second coat has dried, pass over the guitar body with your fine sandpaper to help the paint stick. Use a tack cloth to remove any remaining dust.
-
Add The Paint
I recommend using spray paint to paint a guitar. It's so much easier to achieve a smooth coat of paint this way. If you're confident, you can break out the brushes. But for ease, stick with a spray.
You can make your own if you need spray paint in your chosen color. Add the paint to a spray gun, or use a spray can, and you're ready. You should mix the paint with paint thinner for the perfect consistency.
Apply using confident, long passes with the spray over the entire body. With each pass, aim to overlap roughly half of the previous pass. This will help you build color and smooth out that finish.
The first coat is just that — a first coat. It probably won't look perfect. Don't panic. Instead, leave the coat to dry completely. Please make sure the guitar is in a protected place as it dries. You don't want dust landing in the wet paint.
When the first coat has dried, apply a second layer using the same method. Use the same broad strokes and overlapping passes. Leave the second coat to dry.
Two coats should be enough for a bold finish. If you're considering returning for a third coat, wait to ensure the paint has completely dried. As it sets, the color deepens and evolves.
-
Adding Decorative Art to the Finish
Want to get your guitar looking amazing and super unique? Then you can add touches like personal decorative paintings.
The base coat layers must be completely dry before adding any extra decorations. Otherwise, the paint might bleed and smudge your design.
Ditch the spray bottle and use paintbrushes and paint pots. Enamel paints are excellent at this stage, but acrylic paint should also work.
Note that acrylic art needs to be coated for protection.
Clear Coat Finish
The clear coat finish is a crucial step. This provides a strong and protective layer to the paint. It keeps your paint looking glossy and prevents daily wear and tear from damaging the surface.
Before applying your clear coat, ensure the paint is completely dry. This might take several weeks. Dab the surface using a tacky cloth to remove any dust.
There are two types of clear color coats that you can use: polyurethane and nitrocellulose paint. Both options have advantages and disadvantages, which I'll dive into below.
- Polyurethane clear coat. Polyurethane guitar finishes are easy to find, and low-VOC poly finishes are safer for you and the environment. Poly clear coats are strong and solid, but some believe the thick coating can affect the acoustics.
- Nitrocellulose clear coat. These have had a resurgence in popularity thanks to the thinner layers. The thinness enables the guitar to resonate better. Nitro finishes are easy to apply. However, the soft finish is susceptible to damage. Plus, nitrocellulose finish is high-VOC and restricted in many states.
Whichever coat you choose, apply it in a well-ventilated area while wearing a respirator mask.
Applying Polyurethane Lacquer
Apply a polyurethane clear coat using the same even stroke method as the paint. Leave it to dry completely, which will probably take around 3 hours. Then you can use wire wool to lightly scuff the surface. Wipe away any dust with a microfiber cloth.
Apply the next layer using the same method, and repeat. All in all, you'll need to apply around 15 coats. Scuff the surface after each layer except the last one. You want the final layer to stay glossy.
Now, it's time to play the waiting game. It takes from 14 to 28 days for polyurethane finish to cure.
Applying Nitrocellulose Lacquer
Nitco finish is easier to apply than poly finish because you don't need to scratch the surface. Instead, each thin coat will naturally melt and bond together. However, the drying process is longer.
Once you've applied one layer of nitro finish, wait 24 hours. Then apply the next coat. Repeat the process until you've completed around 15 coats. Remember to wear a mask each time.
When you're happy with the finish, wait for it to dry completely. It takes roughly 14 to 28 days for nitro lacquer to cure.
Finishing Touches: Sanding
You can move on to the final touches with the lacquer completely cured—first, the sanding.
For this step, you'll need ultra-fine sandpaper. You'll use this to wet sand the surface. Wet sanding is a gentle sanding method, washing away grit and creating an even finish.
To wet sand, follow a straight line using a very light touch. You want to avoid breaking through the clear coat finish. You want to brush along the surface.
Soak your sandpaper in water for around 15 minutes before you start the wet sand process. As you sand, consistently dampen the paper.
Polishing
It's time for the final step in painting a guitar. Polishing gives you that glossy surface and will make your guitar look fresh from the factory.
Apply a liquid polish, such as liquid ice, to a rotary buffer. This is a quick way to get an even finish. If you don't have a rotary buffer, use a microfiber cloth.
Once the polish has been applied, wipe away any excess with a clean cloth. It's tempting to rush the polish at this stage, but that can ruin all your hard work. Polish is abrasive, so you need a gentle touch. Otherwise, you can strip away the finish.
And: Put It Back Together
Hopefully, this final-final step will be quick and painless. It's time to put everything back together. Check the labels and photographs to make sure everything is in the right place.
A Few Final Tips
- The best time to paint is a warm and dry day, but not too hot. Wet and overcast weather can prevent the paint from drying. But avoid very hot days as well. The paint might dry too quickly before you have an even finish.
- With the guitar taken apart, it's an excellent time to apply shielding tape to the cavities. This can reduce hum and pickup.
- Before you start, check the paint color by spraying it on a similar wood grain. That way, you won't paint an entire guitar and then realize you hate the colored coats.
Frequently Asked Questions
Can Painting Electric Guitars Affect The Sound Quality?
Appropriately done, painting a guitar should not affect sound quality. A good refinish should replace what was there in the first place. Professional quality electric guitars are painted, and they (for the most part) sound fantastic.
How Much Does A Professional Guitar Refinishing Cost?
Although prices vary, professional guitar refinishing costs between $200 and $300. If you want a custom paint job like a mirror finish, expect to pay upwards of $600. Let a professional handle the refinishing if you have a more valuable guitar.
Can I Use Acrylic Paint On Guitar?
You can use acrylic paint on a guitar, but better paint choices exist. We recommend using enamel paint or a specialist paint.
Can I Paint Over My Guitar?
No, you shouldn't just paint over your guitar. If you don't correctly strip away the guitar's existing finish, the new paint won't be able to bond properly with the surface. It will look bad and flake away quickly. Painting a guitar requires entirely stripping the guitar and starting again.
Conclusion
If you want to paint a guitar, prepare for a long job. Painting a guitar can take several weeks, between the sanding, filling, and finishing.
It's a long job, but it isn't a hard one. You don't need to be artistic to achieve an attractive glossy finish. Refinishing a guitar can also improve durability, so there are many benefits.
If this article has inspired you to paint your guitar, check out our no-nonsense advice on cleaning a guitar.