If you’re new to audio, you may have experienced the frustration of turning up the volume knob only to hear distortion or clipping once you go above 0dB.
Over the years, numerous tools, like the audio limiter, have been developed to maximize the loudness level of any given track.
If you’re an experienced music producer, you’re undoubtedly familiar with audio limiters and their function. However, audio limiters may be an unfamiliar term for those new to the field.
In this guide, we will explore the technical aspects of audio limiters, including how they operate and how they can be integrated into your music production workflow.
Let’s dive in.
What Is An Audio Limiter?
An audio limiter is a device that is essentially a particular type of compressor. Its purpose is to modify the dynamic range of an input signal. This is done by reducing the volume of the loudest portions of the signal that exceed the limiter’s threshold while simultaneously enhancing the quieter sections.
The result is a more even and consistent audio level, which can be especially useful when dealing with audio recordings with a wide range of sound levels. The limiter acts like a safety valve for audio signals, preventing any sudden or unexpected spikes in volume that could damage equipment or cause distortion.
Audio limiting is the final stage in the mastering audio signal chain, where the mastering engineer ensures that the final product meets commercial loudness levels. The interaction between the attenuation of the loud parts and the boosting of soft sounds gives the song overall coherence.
Limiters are available in both hardware and software forms. You can use limiter hardware units or download plugins onto your digital audio workstation. However, software limiters only work with digital signals.
Like compressors, limiters can modify the track’s dynamics. Some limiters can compress multiple frequency bands, although multiband limiters are less commonly used than multiband compressors.
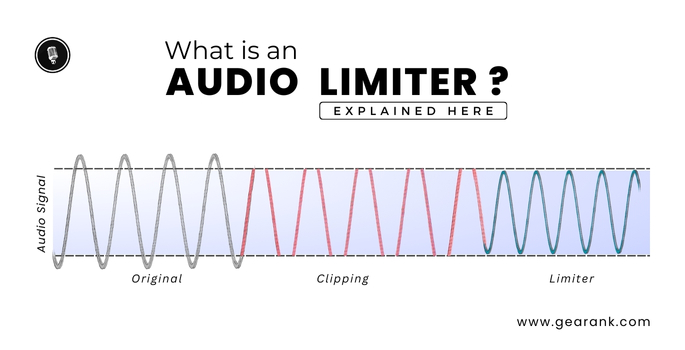
How is limiting different from Audio Clipping?
Audio limiters play a crucial role in regulating the volume of audio recordings. Their primary function is to control the loud parts and bring the quieter parts up to the desired levels. However, achieving the appropriate loudness levels requires some technical knowledge.
Audio clipping is a type of distortion that can severely degrade the quality of music. It occurs when the volume of the music surpasses the limit set by the computer. In digital signal processing, this limit is 0dB and is referred to as digital hard clipping. At the loudest parts of the music, the peaks of the sound wave are cut off, resulting in a clipping effect.
Audio limiters come in handy in such situations. They allow one to push the audio beyond the point at which it’s perceived as loud as long as it stays within the 0dB limit. Audio limiters are a form of soft clipping that can compress the dynamic range of the audio and improve its overall quality. Note that you don’t want your dynamic range reduced too much.
Limiters Vs Compressors
Limiters and compressors are two dynamic range processors used in audio engineering. While both are used to alter the dynamic range, their application differs. Compressors are commonly used in the mixing process to blend individual tracks and balance each instrument.
On the other hand, limiters are typically inserted in the final step of the mastering process to work with a single unmastered track, making it sound louder and more cohesive.
Regarding the technical details, one key difference is how they handle the signal beyond the threshold. A compressor reduces the gain of the signal, while a limiter applies a fixed gain reduction ratio above the threshold.
This results in a more extreme compression effect, preventing the signal from exceeding the threshold and maintaining a consistent output gain level.
-
With a limiter, the threshold provides a hard stop. When the loud parts of an audio signal reach the peak of the threshold, it compresses the wave. This means that no audio passes the threshold with a limiter.
-
With an audio compressor, audio is allowed past the threshold. When peaks reach a compressor’s threshold, it lets some audio pass. However, the volume level is compressed at a ratio setting you control yourself.
It is important to understand the differences between audio limiters and compressors, as they are two distinct tools that serve different purposes in audio engineering. While limiters have a fixed ratio of 12:1 or ∞:1, compressors offer much more flexibility in terms of dynamic range compression.
For instance, when running a track that peaks around -13dB through an audio limiter with a threshold set around -9dB, the limiter will keep the audio at -9dB and no more. This creates a wall that allows no dB to pass through, reducing the dynamic range at these levels.
Alternatively, compressors allow you to choose between a high ratio or low ratio. For example, when the threshold ratio is set at 3:1, only 1 decibel will be heard for every 3 that exceed it. Higher ratios create a more “processed” sound, while lower ratios yield gentler processing.
Compressors are often used for mixing as they only affect the audio beyond the threshold, giving you dynamic control over each track. Limiters, on the other hand, are best used by mastering engineers to affect the entire track due to their high compression.
What are Brick Wall Limiters?
Brick wall limiters are well-known for their ability to stop any audio that tries to exceed their threshold. They are called brick wall limiters because they have an infinite ratio of ∞:1, much higher than the typical 12:1 ratio of regular limiters. While regular limiters can sometimes allow audio to sneak past their threshold, brick-wall limiters are powerful enough to prevent this from happening.
This makes them helpful in pushing the dB levels on a track, especially during the mastering stage. Master engineers often use brick wall limiters at the end of the mastering signal chain to maximize the loudness of a track. However, overdoing it can result in a lifeless audio track. To avoid this, dialing the threshold low enough for a gain reduction of around -2 to -3dB is essential.
One type of brick wall limiter is the true peak limiter, which uses oversampling to represent and process peaks accurately. Digital-to-analog conversion can sometimes fail to capture peak-level information faithfully, but true peak limiters can help get closer to how the peaks would sound if they were analog.
Setting Up Your Limiter
When mastering audio, most limiters have a set of main controls for applying dynamic range compression. Here are the typical settings found within these controls:
-
Threshold
-
Output Ceiling
-
Release
-
Input Gain
-
Knee
Let’s take a closer look at each one of them.
Threshold
When you listen to the final version of a music track, you may find that certain parts of the audio are too loud or quiet. To fix this problem, you can use a limiter to compress the audio and make it more even. To begin, you should set the threshold for the limiter.
The threshold is when the limiter will start to compress the audio. You can start with a fairly high threshold and gradually decrease it until you achieve the desired compression level. A good guideline is to aim for around -2 or -3 decibels of gain reduction. Alternatively, you can set the limiter to 0 to avoid any compression.
Output Ceiling
During the mastering process, it’s essential to understand the difference between the threshold and output ceiling settings.
While the threshold determines when the limiter begins working, the output ceiling controls the amount of limiting applied.
Typically, the output ceiling is set at 0 decibels relative to full scale, but some master engineers prefer to put it between -0.1 and -0.5 to prevent it from exceeding 0.
Release
The release time is the duration for the limiter to stop compressing once the signal falls below the threshold.
Different release times can significantly impact the overall groove of the song. It can make the track feel rushed, dragged, or right in the pocket.
If it is too long, it can create a pumping sound. Conversely, it is too short, and the effect can be jarring. However, if you dial in the proper release time, it can reinforce the groove further.
Input Gain
Input gain is a volume control for the whole audio before it enters another hardware or plugin. This setting is heavily utilized when the unmastered track is too quiet or loud during the mastering stage.
Knee
The knee setting determines the rate at which gain reduction begins in the audio, with a soft knee being gradual and gentle, and a stiff knee being abrupt.
Final Thoughts
Mixing and mastering are two distinct processes in audio production. However, having a good grasp of how an audio limiter works can give you a significant advantage in creating commercial-level tracks.
When a single peak exceeds the maximum level in your audio track, it can result in undesirable distortion. The audio limiter is a powerful tool that helps prevent such clipping while enhancing your track’s perceived loudness. It’s often considered the most crucial step in the mastering process.
If you’re interested in delving deeper into the technicalities of mixing and mastering, and you want to be happy with how your final mix sounds, we recommend checking out what is a noise gate. or our great article explaining what is an audio compressor.
Contributors:
- Allen Articulo – Co-writer
- Jerry Borillo – Illustrator