Making Your Own DIY Acoustic Panels: Prepare Now & Start
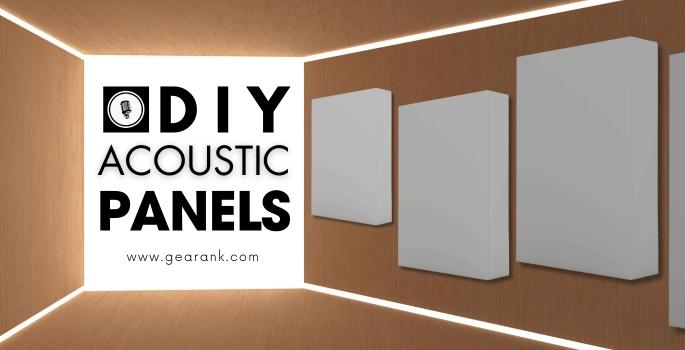
DIY Acoustic PanelsConstructing your own acoustic panels is an excellent and cost-effective way to significantly enhance the sound quality of your space. The advantages of using such devices are numerous and cannot be overstated. |
Acoustic panels play a crucial role in enhancing the sound quality of a room. However, purchasing pre-made panels from a manufacturer can be quite expensive. Fortunately, it is relatively straightforward to create them on your own, even if you have no prior experience.
Building your own acoustic panels can be worthwhile, and in this guide, we'll discuss how to construct and assemble twenty-four-and-a-half-inch by forty-eight-and-a-half-inch acoustic panels at home.
Acoustic panels, also known as sound panels, acoustic boards, or acoustic baffles, serve various purposes and are available in various shapes and sizes.
They are designed to absorb sound, mitigate background noise, and reduce reverberation and echo in a room.
Vertical and horizontal acoustic panels reduce background noise, reverb, and echoes in a room. These panels work by trapping the sound waves that hit them, thereby reducing the amount of sound that reflects off the walls and other surfaces.
When strategically placed, these panels can significantly improve the acoustics of a room, making it more suitable for recording or listening to music.
The benefits of using acoustic panels are numerous. In my experience, the five main advantages of utilizing them are as follows:
-
Sound absorbing panels are easy to install and make.
-
They can give you more privacy.
-
Sound panels can make your space sound more neutral for mixing
-
They can dull reverb, outside noises, and echoes.
If you work in entertainment, sound production, or any other job that demands high-quality sound, acoustic panels are an absolute necessity.
They are crucial in improving sound quality by reducing reflected sound, reverb, echoes, and background noises that can negatively impact your work. Whether you purchase or make DIY sound panels, they will be invaluable to your projects.
To ensure that your own acoustic panels are of high enough quality to treat your studio effectively, following the instructions and getting the right sound absorption material is essential.
Making DIY acoustic panels at home should be easy with the right approach.
This article provides comprehensive information on the importance of sound absorption panels and how to make them. With this knowledge, you can enhance your work and take your sound quality to the next level.
What Do You Need to Make Acoustic Panels?
As someone who has delved into DIY acoustic panels, I can attest to the significant costs of making high-quality sound panels.
However, constructing your acoustic panels is far more cost-effective than purchasing pre-made wall panels.
Acoustic panels, whether wall-mounted, free-standing, or ceiling-mounted, are essential for sound absorption and achieving a clean sound.
You will need specialized tools and materials to create your own acoustic panels, which can be quite pricey.
Considering the upfront investment required before embarking on a DIY acoustic panel project is important.
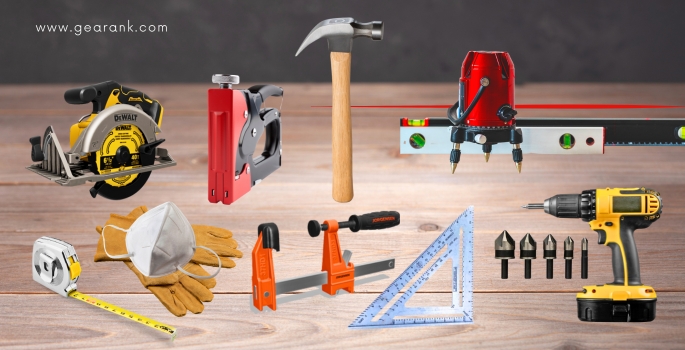
This section will delve into the specific tools and materials needed to successfully construct your own acoustical panels at home.
Many guides on creating DIY acoustic panels often provide lists of materials and tools that are impractical and unrealistic. This can significantly increase the overall cost of the project.
These lists are usually based on the assumption that individuals have all the necessary tools in their workshop or don't consider the cost of even small materials.
I have created a more practical and transparent tool list for making acoustic panels to address this issue. This list includes only the essential items required for the project.
If you already possess some of these tools, you can save on the cost of creating your DIY acoustic panels.
-
Circular Saw
-
Clamps
-
Countersink Drill Bit Set
-
Drill
-
Dust Masks
-
Hammer
-
Laser Levels
-
Speed Square
-
Staple Gun
-
Tape Measure
-
Work Gloves
The cost of the tools required for your DIY acoustic panel project will vary based on the tool's quality, source of purchase, and the availability of discounts.
You can expect to spend roughly $200 on all the necessary tools, but the price may be lower based on these factors.
After acquiring the essential tools, the next step would be to procure the materials required to assemble the acoustic panels.
The cost of these materials will fluctuate depending on how many panels you intend to build. As the quantity of materials will vary per project, the cost of the materials will also differ.
Here's a list of primary materials required for constructing your DIY acoustic panels at home.
-
Plywood Panel – 23/32 Inch x 8 Feet
-
Rockwool Safe n Sound Insulation – 23 Inches Wide by 47 Inches Long
-
Fiberglass Insulation Screen
-
Felt Fabric
-
Adhesive Spray
-
Wood Glue
-
Wood Screws
-
Nail Gun Staples
-
Drywall Anchors
-
Flush-Head Screws
-
Flush Mount Brackets
-
Furniture Bumpers
-
Screw Eye Sockets
-
Carabiners
-
Extension Chain
The pricing of each panel is directly proportional to the cost of its constituent materials. However, the estimated cost of each panel falls somewhere between $30 and $35.
If you want to construct your own DIY acoustic panel, you must factor in the time needed to make one.
The production of a high-quality tool that can be utilized for the purpose will require considerable time and money.
To create a finished product, you should expect to spend several days working on the panels.
It is important to note that sound panel production is not everyone's cup of tea. If you have sufficient financial resources, purchasing them from a reliable manufacturer is recommended.
Creating such panels demands several hours of labor and at least two days to get them up and running. Therefore, think twice before beginning to create your own sound panels.
How to Make Your Own DIY Acoustic Panels
Understanding the necessary equipment and materials for building DIY sound panels is crucial before starting the construction process.
In this section, I will provide a comprehensive guide on how to build them, including all the technical details. Let's begin the process and create some high-quality sound panels.
-
Start by Cutting Your Wood to Size
To begin the process, you must cut the plywood down to size for the wooden frame. The standard thickness of most plywood is 23/32 inches, which is sufficient for the external frame of this project.
If you prefer a slightly thicker panel of plywood, then 3/4-inch thick plywood will also work.
You can purchase a 4-inch by 8-inch plywood sheet and have it cut into four equal pieces at a hardware store like Home Depot to make it more manageable to transport.
However, Home Depot will not cut plywood less than 8 inches wide. Therefore, as required, you will need a circular saw to cut the plywood.
It is highly recommended that you not opt for Medium-Density Fiberboard (MDF) as a substitute for plywood.
Although MDF is cheaper than plywood, it is unsuitable for this project as it produces particles harmful to the human respiratory system.
Also, the employees at the store will not cut MDF, and neither should you. Instead, stick to plywood to ensure a safe and efficient project outcome.
Remember that the panels might end up slightly smaller than I have noted. This is because the circular saw may get a different size. Your panels may be smaller than three inches. But this should not affect the sound panels.
A single piece of plywood can be used to cut nine panels. Two larger pieces of plywood can provide eighteen 47-inch by 3-inch strips, and an additional eighteen 24.5-inch strips can be obtained from the remaining sheet.
To increase the height of the picture frame by 0.75 inches, use the shorter strips on the ends of the longer ones.
The final frame dimensions should be 48.5 inches in height and an interior area of 47 by 23 inches, which is ideal to accommodate eight units of 3-inch thick Rockwool Safe 'n' Sound insulation measuring 47 by 23 inches each, usually found in a single bag.
-
Put Your Frames Together
Before you start assembling your frames, you must make sure that you have the following tools and materials on hand:
-
Drill
-
Countersink Drill Bit Set
-
Speed Square
-
Wood Screws
-
Wood Glue
To prevent the risk of wood cracking while putting the screws in, it is recommended to use a countersink drill bit that creates a pilot hole.
This drill bit also makes a small divot in the plywood, which provides a resting place for the screw head and allows it to sit flush with the rest of the frame.
Use a speed square to mark four holes on the face of the 24-½ inch plywood strips.
These holes should be offset by three-quarters of an inch from the long end of the strip and three-eighths from the short sides.
For the forty-seven-inch plywood strips, you need two pilot holes centered on each edge of the wood, three-quarters of an inch away from the edges.
These holes should align with the other holes on the 24-½ inch plywood strips.
Before screwing the wood strips together, add a bead of wood glue to the end of the forty-seven-inch strips of plywood. This will make the overall acoustic panel stronger. Remove any excess glue from the holes to prevent any mess.
You can also opt for butt joints if you prefer going that route.
Repeat the same process for each of the acoustic panel frames.
-
Install Your Support Panels
When building acoustic panel frames, adding support braces is optional. However, it is recommended to use spare plywood to add support strips to ensure a secure fit.
The support strips should be around 23 inches by 3 inches, but the exact measurements should be taken from the frame for a tight fit.
Clamps are recommended to support the strips while drilling pilot holes to make the installation easier. A drop of glue should also be added to the holes before installing the strips with wood screws.
To attach the plywood strips capping off the frames, pilot holes should be drilled 4.75 inches from the long end of the frames and 0.75 inches from the edge of the frame as it faces upwards.
The screws should be aligned with the middle of the support strips to keep them in place. Two additional screws can be added on both sides of the frame for added security.
These holes should be measured 2.25 inches from the short side of the frames and aligned with the middle of the support strips.
Accurate measurements are crucial for a secure support panel. Following these guidelines, the support panel should fit securely within the frame.
-
Put the Insulation in Your Frames
To properly secure your insulation, it is recommended that you use a fiberglass screen. Cut a length of the screen and place it over the back end of your acoustic panel.
Using a staple gun, securely fasten the screen, ensuring it is taut over the frame. Once that is done, trim off any excess screen.
It is crucial to ensure that the staples are flush with the frame to avoid any snagging issues, which could cause them to stick through the wrap you will put on later.
Hammer down any staples that are not flush with the frame.
Before putting more screens on the other side of the frame, fill it with insulation. If you are not using support panels, fitting the insulation snugly into the frame is easy.
However, if you have support strips on your acoustic panel, you will need to adjust the size of the insulation to fit in the cavity.
Trim down the insulation on each side to fit and accommodate the thickness of the support strips used.
Once the insulation is in place, roll some fiberglass screen on the frame and staple it securely. Ensure the screen is taut and trim off the excess when you are done.
-
Wrap the Acoustic Panels You have Made
Congratulations on successfully building your own DIY acoustic panel! Wrapping the acoustic panel is the final step, which is mostly aesthetic but still essential. For this process, you will need fabric and a spray adhesive.
To achieve optimal sound absorption, we recommend using Guilford Maine fabric. It effectively absorbs the coefficient of your panels. However, felt can also be used as an alternative if you're on a budget. It's thin enough to allow sound transmission which is crucial for sound absorption.
When selecting an acoustic fabric at your local fabric store, you may opt for decorative designs. We suggest lighter-colored fabrics to accentuate darker walls in your home studio.
To wrap your acoustic panel, you will need fabric at least 36 inches wide and long enough to cover the sides of your sound panel. It's okay to have excess fabric, as it allows for errors during the process.
The length of your panel requires 60 inches of fabric, which includes the excess fabric you will cut off. So, each panel you make will need a minimum of 36 inches by 60 inches of fabric.
To start wrapping your panel:
-
Lay the fabric on a flat surface and place the acoustic panel in the middle.
-
Apply adhesive spray on the top and bottom edges of the fabric, making sure to apply it to all sides. When sticking the fabric, it's crucial to pull it tightly onto the wood frame to prevent wrinkling. Make sure to wrap the fabric tight enough.
-
Trim the excess fabric and add four relief cuts to the corners of the fabric to prevent wrinkling at the folding points.
-
Apply adhesive spray to any uncovered edges to ensure everything stays secure.
If your fabric is thin, wrap a second layer around the panel to ensure complete sound absorption. With these steps, you'll have a beautiful and perfectly wrapped DIY acoustic panel ready to use!
How Should You Mount Your Acoustic Panels?
If you have built your own acoustic panels and are now ready to mount them, there are two main options: wall mounting and ceiling mounting.
Flush mount brackets are the best choice for wall mounting, but measurement accuracy is crucial for their effective use.
You will need to drill two holes, 10.5 inches apart, in the back of your panel, ensuring that the brackets are facing downward.
When it comes to ceiling panels, you will need drywall anchors, screw eye hooks, carabiners, and chains.
Install screw hooks on each of the four corners of your panel and screw eye hooks into the ceiling. Attach a chain to the panel and the ceiling hooks to hang your panel.
For effective bass absorption, the panel should be at least four inches thick, with double thickness even more effective.
It is recommended to mount these ceiling panels on the back wall of your studio to reduce low-end standing waves that may disrupt your sound projects.
By creating your own acoustic panel, you can customize it to your specific needs, ensuring optimal sound quality in your studio.
FAQ
In this section, I will answer some of your frequently asked questions. It is crucial to know all the details before starting a project.
Is it Cheaper to Make Your Own Acoustic Panels?
If you want to save money by making your own sound panels, making a batch of at least five panels is advised. This is more cost-effective compared to making just one or two.
Nonetheless, making your own sound panels is still more affordable than purchasing them from a manufacturer.
What is the Disadvantage of Acoustic Panels?
One major issue I've noticed with sound panels is their potential to become a fire hazard.
This is mainly because most sound panels use polyurethane material, which can produce harmful smoke clouds when burned.
However, it's important to note that not all homemade panels may pose the same risk.
And note that you need good sound proofing to make the most of your acoustic panels.
Can you use Bed Sheets for Acoustic Panels?
If you want to prevent particles from your Rockwool insulation from falling out, you should use a fabric with some strength.
Additionally, the fabric you choose should be breathable so the panels can effectively absorb sound. For this purpose, you can use a variety of fabrics, including an old, thick bedsheet.
What Makes Bad Acoustics in a Room?
One of the most common reasons for poor acoustics in a music room is the presence of hard surfaces.
These include bare floors, a tiled floor, walls, and hard furniture such as tables, chairs, and counters. All these elements can have a negative impact on the acoustics of your room.
Acoustic panels can improve sound quality, and the number needed varies based on room acoustics.
Where Should Acoustics Panels be Placed in a Listening Room?
It is generally good practice to put your acoustics panel onto parallel walls and ceiling corners where you are trying to improve the sound quality.
Parallel walls are most prone to standing waves, while corners are prone to bass build-up. Placing acoustic panels to absorb these frequencies will help lower resonances in your room. You can learn how to build DIY bass traps here.
Final Thoughts
Building your own DIY acoustic panels can be a cost-effective way to improve the sound quality of your room.
However, it is important to consider the upfront investment required for the tools and materials needed. The essential tools required for the project will cost roughly $200, and the materials' cost will vary based on the number of panels you intend to build.
It is important to follow the instructions carefully and use the right materials to ensure that your DIY acoustic panels are high enough quality to sound treat your studio effectively.
Making DIY acoustic panels at home should be easy with the right approach.
In conclusion, constructing your acoustic panels can be a fulfilling and cost-effective way to improve the sound quality of your space, and the benefits of using such devices are numerous.
If you want to see another DIY project, check out this article on how to make a DIY vocal booth.
Contributors:
- Alexander Briones - Editor
- Jerry Borillo - Illustrator