Drum EQ: All The Facts You Need To Know Here
Drum EQDrum equalization is the practice of balancing, cutting, and boosting specific frequencies to create a good drum mix. |
Too often, we are often advised just to mix. Then, your ears will adjust over time, and you'll know what's useful and what isn't. There's truth to this statement. You can learn many things just by experimenting.
However, the lack of structure can have the opposite effect on the process. In every mixing session, you must have some fundamental principles to abide by for a more optimized workflow. This is especially true with drum EQ.
Each part of the drum kit will need to be approached differently. So read along as we take you through each drum and its key frequencies. We will also give you a rundown of the EQs you can use.
Equalizer Terminologies in a Nutshell
This article is mainly for people who already know the ins and outs of an EQ. However, we need a quick rundown of things you should already understand. By all means, refer to this section if you missed something.
-
Amplitude: The parameter that controls the loudness of a frequency node, used in conjunction with bandwidth or Q to cut or boost.
-
Frequency: Usually represented as a node, this parameter determines which point of the frequency range is controlled. Altering this does not change the sound if all the other parameters are neutral.
-
Q: The Q factor refers to the width of a frequency band. In equalizer (EQ) settings, you can imagine a bell-shaped curve on a frequency graph. The Q factor determines how wide or narrow this curve is, which gives you a visual representation of the affected frequency range. A higher Q factor means a narrower curve, while a lower Q factor means a broader curve.
-
Bell Filter: This visually represents a bell curve on an equalizer. It allows for precise adjustment of specific frequencies at the center point, shaping the tonal quality of your audio.
-
High Pass Filter/Low Cut Filters: At the lower end of the frequency spectrum, it removes the low frequencies and allows the high frequencies to pass through, visually showing the elimination of undesired low-end content.
-
Low Pass Filter/High Cut Filters: This EQ filter starts at the highest frequency and gradually reduces the amplitude of frequencies above a selected point, effectively filtering out the highest frequencies. It is great for controlling overly resonant frequencies.
-
Subtractive EQ: The process of cutting rather than boosting frequencies. This practice involves removing elements that aren't needed in the track. A common saying in using EQ is to "cut narrow and boost wide." Cutting narrow ensures only problematic frequencies get cut, while boosting wide ensures that no one frequency gets overemphasized.
What Is Drum EQ?
Drum EQ, or drum equalization, balances, cuts, and boosts specific frequencies to create a good drum mix. Think of it as a form of volume control for particular frequencies.
Let's compare the kick and the snare drums. By listening to them, we can quickly tell that the bass drum has a much lower frequency than the snare. Conversely, snare sounds have mid to high-frequency content and don't occupy the same frequencies as the kick.
But what about a kick drum and a floor tom? When making the two drum shells sound more distinct and clear during busy drum fills, we must carefully EQ them.
Which frequencies should you keep and which ones should be discarded?
There is no one-size-fits-all approach to equalizing drums. However, some general principles help balance the tone. When mixing drums, it's important to consider how they fit into the overall context of the song. Each drum occupies a different place in the frequency spectrum, so it's like working on a puzzle.
Ideally, we want to capture the entire frequency spectrum when recording drums and be conservative with our EQ decisions. However, if the drums still overpower other parts of the mix after balancing the levels, we can use equalization to shape the overall sound and make it fit better.
The main challenge is distinguishing the different frequencies in each drum and determining where they fit in the mix. An EQ cheat sheet is a helpful tool to get started and become more familiar with the frequency ranges of each drum. Remember that this is not a one-size-fits-all solution but a guide to prompt your mixing decisions.
The EQ Cheat Sheet
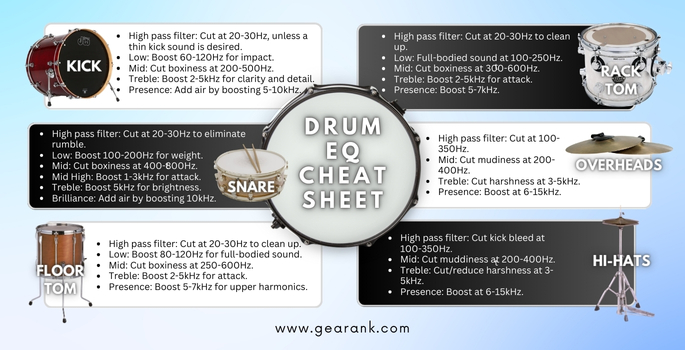
The Drum EQ sheet above is, technically speaking, a compendium of the average frequencies of each drum kit. I mentioned that each mix will have its mixing quirks that must be addressed. However, if you gather all the drum eq knowledge, you will stumble upon the average values and events that generally happen when EQing drums.
Why not start mixing by establishing a reference point? Feel free to break the rules and create your own workflow from here.
How To EQ Drums?
How the cheat sheet came about has to be explained further and broken down to their average frequency bands. Below, we'll give you, in list form, what they are and what they can do if you cut our boost their frequencies.
We will start by focusing on the lower end of the sound spectrum and gradually move upwards. This is where you will identify which drum kit part occupies a specific frequency range. You must ask yourself which frequency ranges are important for a particular drum and whether to cut or boost specific frequencies. Intentional mixing decisions are key to achieving a good mix.
Snare Drum EQ
The snare is the most heavily curated among sound engineers and music producers. For electronic music, it's a never-ending cycle. For live drum recordings, finding the right mic angle and dampening for a tight snare sound is important.
Snare drums have a distinct sound mainly felt in two frequency bands - mid and high. These frequencies allow the snare to cut through the mix. However, when mixing, it's important to use subtle EQ adjustments. Drastic cuts in the wrong frequencies can make the snare sound too thin.
Sound engineers use high-pass filters to eliminate unnecessary low-end energy, such as subs and rumble. This frees up the low end for the bass guitar and kick.
When mixing, snares can often conflict with other instruments, like vocals, trumpets, and guitars. This is because their mid-high frequencies hover around the 1-8kHz mark. To avoid this, each instrument needs to find its designated frequency spectrum.
To identify clashing frequencies and ringing, you can use a sweep. Grab one frequency band with a narrow Q and an amplitude of at least 2-3 dB.
Breakdown
-
High pass filter: Where the low rumble occurs around 20-30Hz. Cut this range to clean up the lows.
-
Low: Boost around 100-200Hz to add weight and fatness to the sound.
-
Mid: Around 400-800Hz is where the boxiness of the sound occurs. Cut within range to reduce.
-
Mid High: Enhance snare pointedness/attack by boosting between 1-3kHz.
-
Treble: Boost around 5kHz for snare brightness.
-
Brilliance: Add crispness and air by boosting around 10kHz.
The higher the frequency range, the more punch and clarity your snare drum eq will achieve. As I said before, there isn't a fixed outcome that you need to aim for. Instead, pick a sound that best suits the context.
Kick Drum EQ
On average, a good kick drum sound should have a 20-30dB cutoff. Rather than prescriptions, it's best to listen closely to how it affects the sound. To determine the right range, you can do a sweep and determine where the sound gets thin. Sometimes, it is better if you leave it be as well.
Kick drums also need some high-end. This is especially true for rock or metal genres, where a boost around 2-5k causes the attack of the beater to become prominent.
The real challenge occurs when trying to balance the kick and the bass. Both have fundamental frequencies that are near to each other. To prevent one from masking the other, consider cutting around the 60-120Hz in either the bass or the kick drum. It doesn't have to be drastic. Cut it just enough to make way for the kick or the bass.
The boosts or cuts, around 60-120Hz, are better when applied to the kick or the bass and vice versa. The same principle applies to other instruments, such as guitars and keys. Make an EQ burrow around 200-500Hz, as the mid-range of kicks can overpower others.
The low and mid-range isn't the only way to make the kick drum hit hard. Kick drums need some high-end as well. This is especially true for rock or metal genres where a boost around 2-5kHz makes the attack of the drum beater prominent - which is important if you want to emphasize the drum beat.
Breakdown
For a quick reference, here is your basic breakdown:
-
High pass filter: Cut around the 20-30Hz mark for a cleaner, more focused low end. Anything above this range can make the kick sound thinner. Listen closely for changes.
-
Low: Boost around 60-120Hz to add impact and body to the sound.
-
Mid: Boxiness occurs around 200-500Hz. Cut this to lessen the cardboard-like sound.
-
Treble: Boost around 2-5kHz for clarity and detail.
-
Presence: Add a little air and presence by boosting around 5-10kHz.
If you want a gentle kick drum, then pick a low-end frequency. This will help you achieve a weak kick without losing sound quality.
Floor Tom EQ
Any tom, regardless drum kits, or whether it's floor or rack toms, only occurs around the transitional passages of the song.
Floor toms only have two areas of importance: the attack and the low-end frequency range. The low end occurs around 80-120Hz. The fundamental frequency of floor toms is found in this range. This is where floor toms' boom and full-bodied sound are also located. Too much boost will make it sound muddy.
The treble at 1-5 kHz is where the attack sound occurs. 1-2kHz will sound snappy as you ascend, while 4-5kHz tends to sound "smacked." Boost around this range, and your floor toms will sound crisp. In 5-7kHz, the upper harmonic tones become more prominent.
The low ringing sound and boxiness will be at 250-600Hz. Just like the kick, this range is where the mids and upper mids of most instruments accumulate. Thus, cutting this will give more clarity for other instruments while still hearing the floor toms.
Breakdown
-
High pass filter: Where the rumble and subs occur. Cut around 20-30Hz for clean up.
-
Low: Boost around 80-120Hz boost for a full-bodied sound. Too much, it becomes muddy.
-
Mid: Lessen boxiness and ringing by cutting around the 250-600Hz mark.
-
Treble: Boost around 2-5kHz for the attack.
-
Presence: Boost around 5-7kHz for upper harmonics and presence.
Rack Tom EQ
Rack toms should contain a warm yet punchy sound. Floor toms and rack toms receive the same treatment. The only exception is that higher toms would have a more fundamental frequency in the upper range.
The use of high pass vs low pass filter differs for rack toms. Always start with the high pass filter. Toms mainly function as transitional elements, and the very low is occupied by 2 the kick and bass and even the floor tom.
The full-bodied sound of rack toms is around 100 to 250Hz. You can can even push the drum bus EQ to about 600Hz, crossing the point of boxiness. Play with their ranges and determine which sound has the clarity and boom that you need. Reduce around 300-600Hz if it's sounding too boxy.
Breakdown
-
High pass filter: Where the rumble and subs occur. Cut around 20-30Hz for clean up.
-
Low: Full-bodied sound hovers around 100-250Hz depending on the size of the rack tom.
-
Mid: Lessen boxiness and ringing by cutting around the 300-600Hz mark.
-
Treble: Boost around 2-5kHz for the beater/attack sound.
-
Presence: Boost around 5-7kHz for upper harmonics and presence.
Overhead EQ
When recording the cymbals, sound bleeding from the other drums will likely occur. Applying a filter to remove low-frequency sounds from different drum kit parts can improve clarity depending on the music genre. On the other hand, boosting the low end can create a more rock-oriented sound.
One way to quickly reduce your overheads is to eliminate the low frequencies. You can apply a high pass filter set at around 250-400Hz to do this. Adjust the filter to find the best balance between keeping the cymbals' sound and reducing the low-end noise.
To reduce the snare's bleeding and make room for other instruments, you can sweep around 500-600Hz with a narrow Q and then EQ out the frequency. Additionally, the harshness of the cymbals usually occurs around 3-5kHz. You can cut around this area to reduce the harshness and create space for other high-frequency instruments like vocals or acoustic guitars.
Overheads usually contain a lot of high-frequency sounds. You can use a high shelf filter set at around 6-15kHz to boost their presence and brilliance. This filter will add energy and air to your cymbals, allowing them to cut through the mix.
Breakdown
-
High pass filter: Cut around 100-350Hz. Reduce drum bleed from the kick drum.
-
Mid: Muddiness can still occur around the 200-400Hz mark. The clang sound of cymbals is around 200Hz.
-
Treble: Around the 3-5kHz mark is where harshness is introduced. Cut to reduce harshness.
-
Presence: A boost around the 6-15k mark will give cymbals more presence. Cut or boost depending on the context.
Hi Hat EQ
When it comes to hi-hats in music, they typically have a sound hovering around the fundamental frequency. However, there is an exception where some hi-hats have a slow decay. On the other hand, some hi-hats have a sharp attack and a slow decay. The EQing process for cymbals and hi-hats is almost the same. You can use a high pass filter to reduce the bleed and boost the highs with a high shelf filter.
If your hi-hats sound more sibilant in higher frequencies, you can use a low-pass filter around 15-20kHz. If the filter reduces presence and brilliance, then you can remove it.
-
High pass filter: Cut around 100-350Hz. Reduce drum bleed from the kick drum.
-
Mid: Muddiness can still occur around the 200-400Hz mark. The clanging sound of cymbals is around 200Hz.
-
Treble: Around the 3-5kHz mark is where harshness is introduced. Cut to reduce harshness.
-
Presence: A boost around the 6-15k mark for air and energy.
Final Thoughts
So, what's one thing about mixing that sound engineers would agree upon? Mixing drums is both an art and a science. Drum EQ involves the science of any drum kit's average frequency ranges. At the same time, figuring out the best sound that expresses the context is art.
Mixing drums is also the practice of getting yourself familiar with each tonal quality of each drum. A well-EQed drum kit is a matter of identifying which frequencies should get a boost or cut. This means managing and manipulating the frequencies so that all the instruments sound clear together.
Of course, these mixing decisions are only possible knowing what an equalizer is. If you want to boost your knowledge of EQs, I urge you to read "What is an Equalizer?" We break down each of the types of EQ and what types are best for what application.
Frequently Asked Questions
What are some of the ways to learn how to EQ drums?
Open any EQ plugin and open a preset. Software EQ manufacturers frequently gather data across standard practices and recommendations. You can deconstruct it by applying it to your drum mix and manually tweak it if it doesn't fit the mix.
What Type of EQ Is Best for Drums?
Right off the bat, use a parametric EQ. A parametric equalizer will give you a degree of flexibility that no other equalizer can provide. A graphic and dynamic EQ have set parameters that can be limiting in terms of honing into a specific frequency. Most DAWs like Logic Pro, Pro Tools, and Ableton have stock parametric EQ.
Contributors:
- Raphael Pulgar - Editor
- Jerry Borillo - Illustrator