What is Reverb in Music and How to Amplify its Effect
Imagine walking through a bathroom, a coffee shop, an office space, and a recording studio with your eyes closed. What kind of sound variations would you notice in each space?
The sense of space you get from the reflection of sound waves in the room is called aural, sonic space. Understanding this concept is essential to understanding reverb in music.
So what is reverb in music, and why is it essential in music production?
Reverberations are all around us. Sound reflections in a particular room can give us a sense of the physical space. Music producers and audio engineers work hard to master creating space in their recordings. Listeners can easily distinguish where the vocals are coming from, where the drums are positioned, or even the distance between two sounds.
If you want to design unique soundscapes that your listeners will enjoy, then you must master the basics of reverb.
We will walk you through:
-
What is Reverb?
-
Run-through of Reverb's History
-
Reverb Parameters
-
Common types of reverb
-
How should you use reverb?
-
General Reverb tips on instruments, common mistakes, and song referencing.
What Is Reverb?
Reverb occurs when sound waves in a room bounce off surfaces.
When a sound is produced, it travels in all directions and reflects off surfaces and objects. The sound waves are reflected multiple times and reach our ears simultaneously. This creates the reverberating effect heard after the direct sound or sound source.
In music production, reverb is commonly used to add depth and character to recordings. By adding reverb, producers and engineers can create the illusion of the track being recorded in different spaces.
The sound of a room is defined by the arrival time, density, and frequencies of the reflections when we perceive them. Modern-day reverb units and reverb plugins can make a room sound larger or smaller, creating distance or a sense of intimacy.
Reverb can enhance your mix and give it more dimension if used tastefully.
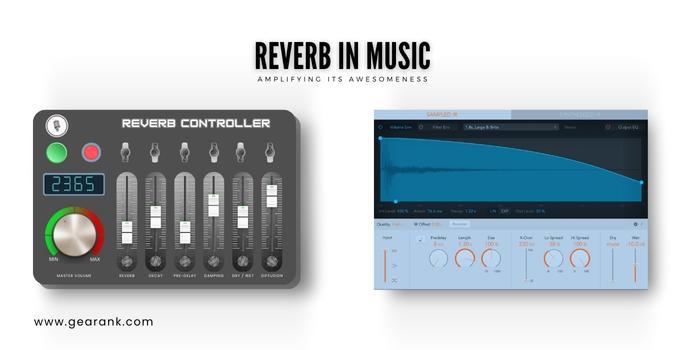
Reverb Parameters
Understanding the parameters in reverb plug ins is now more accessible, as I have provided a detailed explanation. In simple terms, these settings allow you to control the reverb effect's length, density, and quality. However, there is more to these parameters than just adjusting these factors.
The most common parameters are:
-
Decay time
-
Pre-delay
-
Damping
-
Dry/wet
-
Diffusion
1. Decay Time
The decay time is an essential parameter in determining the duration of the reverb effect. It is measured in seconds and represents the time taken for the sound to fade away after entering the reverb. A longer decay time results in a more ambient and washy sound, while a shorter decay time produces a more roomy effect.
2. Pre-Delay
The pre-delay knob determines the time between the sound source and the first reflections. Increasing it makes the reverb sound farther away while decreasing it makes it closer.
3. Damping
The damping setting adjusts how much high frequency is reduced as the echoes decay. This effect resembles adding more acoustic foam to a room to absorb sound waves. Lower damping values will result in a brighter reverb sound, while higher values will make the sound darker and more mellow.
4. Dry/Wet
This knob controls the balance between the dry (original) and wet (processed) signal after it passes through the reverb unit or plugin.
5. Diffusion
The "density" of reverb reflections can be adjusted with this setting. Lower values allow us to hear reverb reflections clearly, while higher values create reverb that is denser and more washed-out. Lower diffusion settings sound choppier, while higher settings produce a smoother, more typical reverb sound.
A Run Through of Reverb's History
The history of using natural reverb in environments like caves and cathedrals and shrinking them into plugins is fascinating and crucial to understanding reverb parameters. People have tried to control and utilize reverb throughout different periods, leading to 4 encapsulated phases:
-
The quest to control natural reverb
-
Reverb chambers and stairwells
-
Mechanical reverb
-
Hardware and software reverb
1. The quest to control natural reverb
During the early periods of music, namely the Renaissance, Baroque, and Classical eras, structures such as cathedrals, chapels, theatres, and halls were designed in a particular way to create the desired reverb—this involved experimentation with materials like solid walls, columns, curtains, and other objects.
As time passed and vinyl records became popular from the 1930s to the 1950s, controlling the amount of reverb or the sound source heard largely depended on the distance between the mic and the sound source. The closer the player was to the mic, the more "dry" audio signal was heard, and the further away picked up more reverb.
However, during these periods, there still needed to be a way to control the reverb and the sound source separately.
2. Reverb chambers
Bill Putnam Sr., an audio engineer in the 1940s, found a way to separate the sound source from the reverb through chamber reverb.
A chamber reverb is a separate room with reflective surfaces where the original sound is played through a loudspeaker inside the chamber, and a microphone picks up the reverberations of the chamber. This was considered a significant breakthrough in audio engineering.
The earliest example of a song using chamber reverb is The Harmonicats' “Peg o’ My Heart.”
However, adjusting the distance between the microphone and the speaker could only take you so far. There was no way to fully control the decay and timbre independent of the echo chamber.
3. Mechanical Reverb: Invention of Spring reverb and Plate reverb
During the same time frame, there was an increasing demand for new reverb types in homes and churches. In the 1940s, the spring reverb was first introduced as a feature in Hammond Organs. On the other hand, plate reverb was invented by a German company called EMT in 1957 for use in professional studios.
Both spring and plate reverb operate similarly - a transducer causes the springs or metal plate to vibrate on one end, and a pickup on the other end picks up the sound. The decay of spring reverbs is usually controlled by applying different oils, which causes them to have longer or shorter decay times.
In plate reverbs, decay is effectively controlled by installing a damping plate near the metal plate, shortening decay times.
4. Digital Reverb: Hardware and Software
The challenges of achieving natural reverb vs echo chambers were significant due to limitations in physical spaces and the high cost of construction. Mechanical reverb systems were also problematic because they were too bulky and could wear out quickly. As a result, hardware and software reverb units were developed to address these issues.
In 1976, the German company that created the plate reverb introduced the first algorithmic reverb, the EMT 250. Algorithmic reverbs are based purely on numbers and physics. Thanks to recent technological advancements, it has become possible to replicate the physical behavior of these reverbs and transform them into algorithms. The reverb sound occurs in within these digital reverbs, with process audio signals.
Convolution reverb, on the other hand, is based on actual recordings of reverbs rather than just pure math. To create an Impulse Response (I.R.), a click or gunshot is used to measure how the room responds to a signal. This information is then used as a basis to recreate the characteristics of that reverb. In 1999, Sony introduced the DRE-S777, which utilized convolution reverbs.
In the late 2000s, digital workstations for computers became the preferred method for music production, making the process easier and more accessible. The operating principles between hardware and software digital reverb remain the same. However, plugins offer a more portable solution, which has become the norm in the music industry. Convolution reverb plugins are now widely used by home studio and pro studio owners.
Thanks to digital reverb technology, most guitar amps now come with reverb. But these reverbs usually have basic functions, so some guitarists still opt to get a dedicated reverb pedal.
Common types of reverb
Reverb types simulate the sound of a real acoustic space with controllable parameters. The market offers a wide range of reverbs, from conventional to unique and experimental reverb sounds.
This list can be a starting point to add variation to your soundscape. You can achieve a unique sound by mixing different types of reverb and adjusting the same parameters with a different room reverb.
Room Reverb
When you want to create a reverb effect that simulates the reflective properties of a room, you can use a room reverb. This type of reverb effect is beneficial when you want a shorter decay time. Room reverb is commonly used in tracks featuring pianos, vocals, or drums, as these instruments are often played in a room and benefit from a natural ambiance.
Plate Reverb
Plate reverb is a type of mechanical reverb that was created in the late 1950s. Unlike chamber, hall, and room reverb, plate reverb is an artificial reverb. It was invented when sound engineers experimented with ways to fully control and isolate the wet reverb signal from the original sound.
Plate reverbs consist of a large metal plate that is vibrated by an electromechanical transducer. A contact microphone then captures the vibrations, producing a bright, metallic sound that closely mimics natural reverb.
One of the most iconic reverb sounds of the 1980s came from the EMT 80, a plate reverb unit that has become a staple in the early years of Abbey Road Studios.
Spring Reverb
Spring reverbs and plate reverbs are similar but use different mechanisms to produce the reverb audio effect. While plate reverbs use a metal plate, spring reverbs use spring attachments placed inside a metal case. The spring reverb was first introduced in the Hammond Organ in the 1940s. Since then, these reverb types have become frequently used in guitar amplifiers, producing a bright and bouncy sound.
Chamber Reverb
During the early days of music production, studios constructed specially designed rooms and chambers solely for recording reverb separately from the original sound source. A loudspeaker and microphone were placed inside the chamber to achieve this. A track was played while a microphone picked up the resulting reverberations.
Chamber reverbs are widely used in recording studios due to their natural and warm sound quality. This type of reverb was famously used in classic recordings of The Beatles, and today, it is still used to create a vintage sound that brings back memories of past recordings.
Hall Reverb
Hall reverbs are named for their ability to recreate the sound of a concert hall or a cathedral. They feature long decay times and are typically used to produce a large, ambient sound. Also, hall reverbs can create spatial separation between tracks due to their long reverb tails. Advanced reverbs come with multiple / variable concert halls, cathedrals, and other spacious reverb types.
When used appropriately, hall reverbs can add power and atmosphere to a mix.
How should you use reverb?
When it comes to music and post-production, it's essential to understand that reverb is not just an effect you add to a track for the sake of it. Instead, it should be treated as a standalone element that complements the overall sound. The context of the soundscape you want to create will determine how reverb is used.
To create a sense of space
It's crucial to establish a sense of space to enhance the overall mix. All recorded sound tracks can sound cohesive with proper reverb settings despite being recorded separately.
To create depth and width
Natural sounds have their designated place in the real world. Without reverb, multiple tracks can clash with one another. Achieving depth and width perception and stacking reverbs is an art that requires much experimentation to understand fully.
A good mix is easily navigable for listeners when each track or instrument occupies its spot in the stereo field. Using panning and adding reverb techniques, you can place other elements at the back or side to create that separation.
To create a mood or an atmosphere
Creating unique and otherworldly soundscapes can be achieved through space and separation. Atmospheres can be tailored to evoke a specific mood or emotion. For example, using less reverb can make the sound more intimate. On the other hand, adding a long, dark reverb can contribute to a sense of tension or anticipation.
To add a unique character to the mix
Reverb is an essential tool for creating a specific atmosphere in music, and it has been used by different styles and artists throughout different music eras. Chamber, spring, and plate reverbs were popular for almost three decades, from the 60s to the 80s, due to the technological limitations that gave these eras their signature sound. However, since the late 2000s, pristine-sounding reverb plugins have become increasingly popular.
With the abundance of music references and plugins available, you can customize your reverb settings to create a unique sound that will remind listeners of your work.
To cushion loud, aggressive, and punchy sounds
Regarding drums and high-pitched vocals, reverb can soften the impact of loud sounds. For instance, it is a common practice in music mixing to add some reverb to the snare drum to blend in with the rest of the drum kit.
The same technique can also be used to tone down aggressive vocal parts by adjusting the balance between the wet and dry signals or automating the reverb and volume during loud parts.
The same reverb technique is also popular in music genres like drum and bass, dubstep, and EDM, where the buildups and drops are accompanied by automated reverb to create anticipation and subtly reduce the sound's thickness.
To add effect
The guidelines above are primarily for mixing purposes. However, you can also use them to add an effect to create a unique sound. Many sound designers and musicians have used reverb creatively for unintended purposes. For instance, reverse reverb and gated reverb effects are famous examples.
Reverse reverbs, as the name indicates, output the reverb in reverse. They are commonly used as shimmer reverb for guitars, and is a mainstay among green and in electronic genres, they are used as sweeps to transition from pre-chorus to chorus.
Gated reverbs were used in snare drums in the 80s. Instead of the reverb tail smoothly tapering off, the reverb is quickly attenuated by a noise gate. This effect can also be heard in stutter synths in EDM. You can take any dry synth pad and add reverb to the insert to achieve this. Then, you can create a stutter effect by applying a square LFO to chop up the sustains.
General Reverb Tips for Instruments
The knowledge of reverb techniques in audio production rapidly expands as people discover new approaches. Usually, reverb effects are created separately in a reverb bus set as a pre-fader. Setting the bus to pre-fader means that the original signal is sent before the volume fader, so any volume changes you make with the original track will not affect the volume level of the bus. A reverb bus allows you to control the reverb effect apart from the actual track independently.
Alternatively, you can slap a reverb plugin as a track insert and adjust the dry/wet signal knob. However, this only works if the track only needs a little tweaking. The disadvantage of this method is that any tweaks you make after the reverb will also affect the original sound signal. These are general tips to help you get started, and you can modify them to fit your preferences. So, read along and learn how to use reverb techniques effectively in
Vocals
Determine the desired vocal sound—short decay for intimate sound, long tail for atmospheric. Listen to JVKE's Golden Hour.
Reverb automation is commonly used in music production. Typically, the reverb effect is not used in the verse and is introduced in the pre-chorus and chorus to create a contrast. To achieve a washy effect, the decay time in the pre-chorus and chorus is usually set to cathedral reverb, which is around 0.88-1 seconds.
Drums
When it comes to applying drum reverb, there is no single agreed-upon process for mixing drums. However, sound engineers generally recommend using a single reverb to help the whole drum kit blend.
Typically, all drum kits except the kick are sent to the bus, as the low frequency of the kick can quickly muddy up the mix, and its transient can get washed out by the reverb.
Out of all the drum components, the snare is affected the most by reverb. To ensure the best results, you need to consider the snare's decay and pre-delay in the mix's context. Generally, the decay and pre-delay of drums are kept short.
Guitars, Keyboards, and Other Instruments
Depending on how these instruments are played, sustained sounds from guitars, keyboards, or Clarinets may require you to adjust the reverb tail to avoid clashing with other instruments.
As a general rule, if the reverb muddies up other instruments, consider reducing the decay, EQing the low frequencies of the reverb, or using a different time-based effect like delay altogether.
For short-sustain instruments such as xylophones, marimba, or mallets, a longer reverb decay and a slightly longer pre-delay would be more appropriate.
Bass
Like with the kick, using reverb on the bass is not common. When a reverb effect is applied to an instrument with rich, low-frequency content, it can lose its low-end clarity, attack, and muddy up the mix.
However, this rule has some exceptions, such as the double bass, which has little sustain. This technique could also work with bass synths like the supersaw bass and its variations. When working with synth bass, a common practice is to apply reverb only in the low or high-frequency content while keeping the low content unprocessed.
Keep your reverb sounds balanced.
When mixing a track, you must be mindful of the amount of reverb you use. Too much reverb can make the track sound cluttered and muddy, making it challenging for listeners to distinguish individual elements of the track. Moreover, excessive reverb can create an overly ambient sound, making the track feel distant and detached.
To avoid these issues, it is essential to strike a balance between adding atmosphere and keeping the mix sounding clear, focused, and present. This can be easily achieved by reducing the volume on the reverb bus and EQing out the muddy low end.
Try using a higher pre-delay value if you want a washy reverb without burying the track in the mix. This will ensure that the early reflections do not kick in immediately after the track, creating a more balanced and natural sound.
Practice replicating and recreating reverb sounds
It's best to use song references and experiment with your reverb plugin to improve your ability to distinguish between different reverb settings. Please take note of the most common reverb patterns in every musical genre from the 1960s to the present day, and learn how various artists use reverb in their music.
Break down the reverb settings according to their parameters. Determine the length of the reverb tail (decay), how far away the reverb is from the sound source (pre-delay), and how much high-frequency content is retained or lost in the later stages of the reverb sound (dampening).
Iconic reverb sounds emerged due to technical constraints, which also makes it easier to replicate them. You can copy the settings of each instrument from different eras to the best of your ability. For example, music from the 1960s to the 1980s generally has a warmer reverb due to the limitations of analog recordings. Music from the 1980s tends to use gated reverb on drums and longer decays for vocals. In contrast, music from the 1990s and onwards generally has a brighter reverberated sound because of technological innovation.
Final Thoughts
So what is reverb for? Reverb is an intriguing tool that enables you to simulate the sound and ambience of a specific environment.
The reverb parameters allow us to determine the characteristics of the reverb and how we want it to sound.
Moreover, we have explored their various use cases in music production and the rich history of how reverb units were gradually developed.
This can be very helpful in giving your track the depth and atmosphere it needs and can also assist in bringing all the elements together.
Contributors:
- Allen Articulo - Co-writer
- Jerry Borillo - Illustrator